Table of Contents
Was your dog born deaf? Has he suddenly lost his hearing, perhaps due to trauma or illness? Or has he recently been diagnosed with progressive hearing loss?
Regardless of the cause or the severity of the condition at this point, you’re going to have training issues, so you’ll need know how to control your dog and help him live to his fullest potential.
The good thing here is that training a deaf dog isn’t really all that much different from training a dog that can hear. You just have to learn a different language.
The thing is, humans who are not hearing-impaired depend on speech in order to communicate. We pretty much take it as a given, although we don’t necessarily have to; many people who have perfectly good hearing take advantage of ASL (American Sign Language) courses so that they can communicate with others who cannot rely on speech.
Dogs, of course, learn to respond to spoken commands, but it’s not their natural means of communication. Anyone who has ever observed their dog “bowing” when he wants to play (and that would be just about everyone!) knows that dogs get their message across very effectively without ever needing to make a sound.
Training a deaf dog depends on body language, plain and simple. So if your dog is deaf, or getting to the point where he will no longer be able to hear you when you verbalize what you want him to do, your course of action should be to help him get back to his natural form of communication.
Do You Need a Trainer?
It’s unlikely. An outside trainer could help, but really, what your dog probably needs is your help. He wants to work with you and listen to you. And you can help him with hand signals.
Here’s how it works.
Getting Started
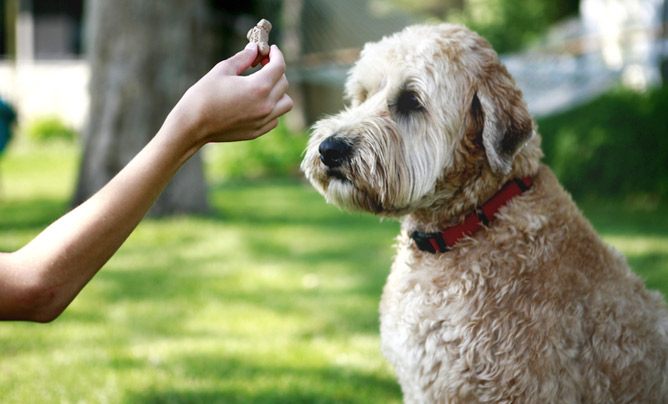
If you’re going to teach your dog anything at all, it’s best to do it with treats. He’s not going to hear your voice, but he will see you offering a treat. You’ll find that training is most effective when you offer something your dog really, really wants – what is commonly referred to as a “high value” treat.
Once the dog sees the treat, you’ll show him what you want him to do, and add a hand signal. You can use signals that you make up, if you like, although the disadvantage to this would be that your dog will respond only to your instructions, and have no idea whatsoever what anyone else might be asking of him. Most of us outlive our dogs, but if something should happen to you, your deaf dog will be confused and frightened if he has no way to communicate. For that reason, it’s generally best to use ASL signs or UD (Utility Dog) signs. You can refer to these sites to view the signs; I won’t attempt to describe them to you, since an illustration will be more helpful.
Bite Inhibition
One of the first things a dog needs to learn is that humans have sensitive skin. A puppy that is able to hear is fairly easy to train not to nip, simply by pulling away your hands or feet, pushing him gently back, and saying, “No.”
A hearing-impaired puppy may take longer, simply because he doesn’t get the verbal reinforcement. The process is the same – pulling away the hands or feet and pushing gently. When he stops nipping, instead of offering the standard verbal praise, you can make the sign for “Okay.” It’s the same one that you use when you’re trying to communicate to a human who may be out of range of hearing, or if you’re trying to communicate over a lot of noise – just the thumb and forefinger together, and a slight accompanying gesture.
Related Content:
An Essential Guide to Dog Commands and Dog Training (Video)
7 Signs That You Are Ready to Adopt a Dog
11 Tips for Training Your Pit Bull (Video)
Sit
This is usually the second thing a dog is taught, after bite inhibition. If your dog can no longer hear you telling him to sit, you’ll need to give him a bit of a “refresher course,” going back to the way you taught him to sit in the first place. Hold a treat close to his nose, and then draw your hand toward his ears until he assumes a sitting position.
Once your dog clues in, and you can tell that he’s thinking “I know how to do this!” it’s time to add a hand signal. Once your dog learns the sign, he’ll respond to it in the same way as he would a verbal command, and you can stop using treats.
Down
Most people, regardless of whether their dog is hearing impaired, typically find teaching “down” to be a little more difficult than teaching “sit.” It’s best taught after the dog is responding properly to the signal for “sit.”
With the dog sitting, place a treat in front of his nose, and then lower it to the floor. Be careful not to move your hand forward, otherwise the dog might stand. As you lower the treat, your hand will naturally form a signal for “down.” However, if you like, you can also incorporate the ASL sign.
Some dogs are resistant to this method, so you may need to try something else. Sit on the floor, in front of your dog, with one leg extended. Put the hand holding the treat under your leg, and draw it back so that as your dog moves forward to get the treat, he has to lie down to fit under your leg. Then give him the sign for “down,” and let him have the treat.
Stand
This is a command that’s not used all that much, but it can be useful at the groomer’s, or during a veterinary examination.
Again, you’ll begin with the dog in a sitting position. This time, though, you want him to “break” the sit, so extend the hand holding the treat and raise it above his head. When he stands, give him the treat, and then put one hand under his collar and your other hand under his tummy, and hold him in position for a few seconds. Repeat the exercise, each time adding a second or two to the time that you keep him in the standing position. If you do this often enough, eventually, the dog will remain standing until you give him the “Okay” sign, meaning that the exercise is finished.
Stay
Most dog owners find that teaching a dog to stay, regardless of his hearing ability or lack thereof, is the most difficult lesson. With patience, though, it can be done.
Begin with the dog in a sitting position, and make the UD or ASL sign for “stay.” Then, give him a treat. Make the sign again, and give him another treat. Do it once more, and then release the dog using the “Okay” sign.
Now, go back to placing your dog in the sit position, and repeat the entire exercise – this time, with a second or two more between giving the sign and letting the dog have the treat. If he moves, withdraw the treat, put him back in the sit position, and try again. What you’re trying to convey here is that moving means that there will be no treat.
Next, add some distance between yourself and the dog, but keep the intervals between giving the sign and giving the treat short. Then, gradually increase the time. Once your dog stays for as long as you want him to, you can add some distractions. Again, if he breaks the stay, no treat. It will take some time before your dog will stay consistently no matter what’s going on around him, but with patience and persistence, he’ll get there.
Leave It
One of the most useful things you can teach your dog is to not take something he shouldn’t have. Once the “leave it” command is firmly entrenched in your dog’s mind, you’ll be able to make him stay away from things that could harm him, even if he finds them very desirable.
Hold a treat in the palm of one hand, and make the “leave it” sign with the other. When the dog tries to take the treat from your hand, close your hand, but don’t raise it or pull it away. Likely, the dog will nose your hand or paw at it. When he stops, even if it’s only for a second or two, make the “Okay” sign and give him the treat.
As with most things you’ll teach your dog, patience and repetition are the keys here.
Come
What you want to do here is teach your dog that coming to you will always have a good result. “Come” can be very difficult to teach, and requires a great deal of patience, because there are so many things that your dog might find far more interesting than responding to your command. It’s vital that he learn, though, because it could save his life if he’s about to wander (or run!) into danger.
It’s easy to get frustrated with a dog who persistently refuses to come. You tell him, or signal to him, over and over, but he doesn’t respond. Then, I’m not going to lie to you, it can be very tempting to punish him once you do get hold of him.
Please, please resist the temptation. If you give into it, you can bet that your dog is going to remember what you did, and he’s going to think “My person called me and called me, and then punished me when I did what I was told. So, if I come, something bad could happen.” You will have delivered a message that’s the complete opposite of the one you actually wanted to convey.
To teach your dog to come, you’ll need a leash (about 6 feet, usually, and no more than 20). Put the dog on the leash, and get him to sit. Move away a bit, and then tug on the leash and sign, “Come.” When the dog reaches you, step on the leash so that he can’t move away, and give him a treat. Repeat the exercise, gradually increasing the distance between you and your dog.
I can’t stress enough the importance of patience when teaching your dog to come. You might feel as though you’re never going to get there, but you will. And when (not if) all your efforts seem to have gone out the window, remind yourself that this is going to take a lot of time; in fact, many professional trainers say that it can take up to two years before you’ll reach the point where your dog will come consistently.
Walking on Lead
I often see people out with their dogs, walking on lead, and the dog is actually walking the person. Dogs are just naturally going to try to pull on the lead, but you can train your dog to walk politely on leash.
Put the dog on the leash, pat your leg to get his attention, and when he moves beside you, give him a treat. When he pulls, stop moving, and don’t give him anything. Then, begin walking again, patting your leg and giving him treats when he moves into position.
Have you noticed that there’s no actual “sign” here? That’s because this is actually one instance in which training a deaf dog is no different from training one who can hear!
Again, the key to success is repetition, and rewards.
Related Content:
An Essential Guide to Dog Commands and Dog Training (Video)
7 Signs That You Are Ready to Adopt a Dog
11 Tips for Training Your Pit Bull (Video)
The Final Word
This is just a very basic introduction to training a hearing-impaired dog. The methods are essentially the same as those for training a dog that can hear; you’re just replacing verbal commands with UD or ASL signs. And if your dog was formerly able to hear, you’re simply giving him a refresher course in commands that he already knows, and showing him another way of communicating.
Most dogs love to learn, and want to please you. So make the training sessions fun, the same way as you would for a dog that is able to hear. Offer praise in the form of petting and cuddling, and give positive reinforcement in the form of treats. In time, your dog will be fully comfortable with this new way of communicating, and you will have forged an even stronger bond with your best buddy.